one dimensional two dimensional three dimensional
1 Activities for this section:
Shaping up, The fab four, Solid shapes, Fighting crime
2 The purpose of definitions
Our goal in this chapter is to compare and contrast shapes. But before we can do that, we need to understand what we mean when we use different terminology for shapes. In other words, we need to have good definitions.
Definitions play a very important role in mathematics: they tell us specifically what we are working with. It can be hard to understand why this is important, but here are two examples that could possibly help.
First, here’s an example from our previous course. I could make a statement like “ is a factor of ”, but to verify whether or not my statement is correct, you would first need to know what it means to be a “factor”. We used the definition of a factor in this instance: is a factor of if we can write for some whole number . So, in this case, you can say that is indeed a factor of because , and that is a whole number playing the role of . At this point, we don’t have any questions or doubts about whether my statement is correct, because our definition was satisfied.
Second, here’s an example that we’ll expand on in a moment. I could make a statement like “the figure below is a square”.

Children as young as preschool and kindergarten learn to identify shapes by their names, using their experiences and a collection of examples and non-examples that they remember. But as children progress through school, they should learn to be more and more specific about how and why they are classifying shapes, including learning to use precise definitions. As teachers, we want you to know and understand the definitions so that you can help children move towards using those definitions.
Good definitions are specific and actionable. When we use them, we know exactly what we are working with.
Good definitions are also easy to use. Since we want to use them a lot, we don’t want to include extra items in our definitions, because that would leave us with more things to check when we check the definition.
Good definitions are a habit in good mathematical work. Any time you are working with an object, its definition should be nearby!
3 Shapes
We are going to discuss together in class how and why we have chosen these definitions, and why they are good definitions. If you weren’t able to be in class for that session, it’s important for you to stop and look through the Shaping Up activity before you continue reading.
We hope you will use the rest of this section as a reference guide. Return to it frequently as you need these definitions!
In this section, we’ll discuss 2D shapes. Keep in mind, however, our discussion about dimension: when we talk about a 2D shape, in order for the shape to actually be two-dimensional, we need to include both the line or lines that draw the shape as well as the inside of that shape.
What dimension are the line
or lines that we use to draw the shape?
An edge of a shape is a straight line segment that we use to draw a shape. For example, the shape below has edges.
We will sometimes use the word “sides” instead of edges. In 3-dimensional space, the term “sides” can be confusing
for many students, so we will prefer edges in that context. 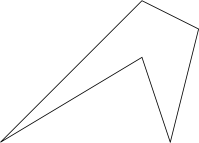
A vertex of a shape is a point where two edges meet. (If you have more than one vertex, they are
called vertices.) For example, the shape above has vertices, which in this image are labeled with dots.
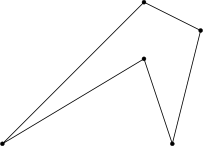
Notice that a vertex doesn’t have to be labeled with a dot in order to be a vertex.
A shape is called closed if all of its vertices are found where at least two of the edges meet. The examples we have
seen so far are closed, and here is an example of a shape that is not closed. 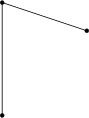
Another way that some people like to think about a shape being closed is that it might hold water or that we have
an inside and an outside of the shape.
A shape is called simple if we could draw all of the edges without crossing over other edges that we have already
drawn. The examples we have seen so far are simple (even the shape that isn’t closed), and here is an example of a
shape that is not simple. 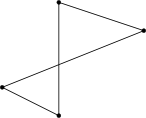
A polygon is a 2D shape which is closed and simple and has edges (or straight sides). Here is an example of a
polygon. 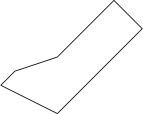
We have special kinds of polygons that we will talk about frequently.
- A triangle is a polygon with edges.
- A quadrilateral is a polygon with edges.
- A pentagon is a polygon with edges.
- A hexagon is a polygon with edges.
- An octagon is a polygon with edges.
Often, it can be easier to write out the definition of a polygon and substitute the specific number of edges you are working with. For example, here is the definition of a triangle again.
A triangle
is a 2D shape which is closed and simple and has straight sides. Here is an example of a triangle.

We also have other special quadrilaterals whose names mostly come from using Greek prefixes for numbers. For instance, “hexa-” means in Greek, so a “hexagon” is a polygon with 6 straight sides. Similarly, “nona-” means in Greek, so a “nonagon” would be a -sided polygon.
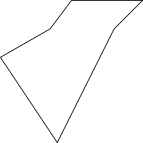
Here is one very confusing point. We have defined all of our polygons as two-dimensional shapes, meaning that we have included the boundary and the inside of the shape. However, we will use the word “triangle” to sometimes refer to the 2D triangle we just described, and sometimes we will use the word “triangle” to refer to the 1D boundary of the triangle. Some textbooks use language like “triangular region” to refer to the 2D shape and save “triangle” for only the 1D shape. You can use this language if you find it helpful to bring clarity to your explanations. The main point here is to be sure that you are paying attention to dimension.
Next, we have special vocabulary to talk about the side lengths of triangles.
An equilateral triangle is a triangle whose sides are all the same length. Here is an example of an equilateral
triangle. 
Notice here that we said “sides” for the equilateral triangle instead of edges. We could have used the word edges,
but “sides” feels a little bit like more everyday language when we start talking about triangles. Since a triangle is a
polygon, we know that these sides have to be straight sides. Watch out for these ideas as we move
forward!
An isosceles triangle is a triangle with at least two sides which sides are the same length. Here is an example of an
isosceles triangle. 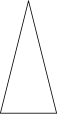
Notice that the definition for an isosceles triangle says “at least” two sides. That means that an equilateral triangle
also meets the definition for an isosceles triangle! The idea that a shape can satisfy more than one definition at once
is the beginning of thinking about how to compare and contrast shapes.
A scalene triangle is a triangle where none of its sides are the same length. Here is an example of a scalene
triangle. 
When we work with triangles, we often designate one of its edges as the base of the triangle. We are usually most accustomed to seeing the bottom edge labeled as the base, but any of the three edges of the triangle can be chosen as the base. Once we choose the segment called the base, we can also find a segment called the height of the triangle.
The height of a triangle is a segment which makes a right angle with the chosen base of the triangle
(or an extension of that base) and also passes through the vertex of the triangle which is not on the
base.
There is quite a bit of terminology to describe what we are discussing here, so in your future classroom we encourage you to look at your textbook closely. For example, some books use the term baseline to describe the extension of the base into a line. Other books will use altitude for what we just described as the height (the segment connecting the base to the opposite vertex), and will use height to refer to the length of the altitude. If these distinctions help you to write more clear explanations, we encourage you to use them!
This definition is a bit easier to understand with a picture, so let’s take a look.
Let’s find the height of the triangle
below in two different ways. 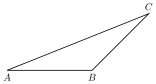 First, let’s choose the bottom side of this triangle as the base. If we do so, we should first notice that the vertex
which is not on the base (labeled in the image above) is not directly above the base, so we will extend the base
using a dashed line.
First, let’s choose the bottom side of this triangle as the base. If we do so, we should first notice that the vertex
which is not on the base (labeled in the image above) is not directly above the base, so we will extend the base
using a dashed line. 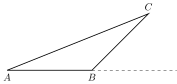 Next, we need to draw a segment which makes a straight right
angle with and passes through . Try doing this with your protractor on your own!
Next, we need to draw a segment which makes a straight right
angle with and passes through . Try doing this with your protractor on your own! 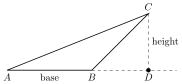 We have labeled the intersection of the extension of the base and the perpendicular line as , and our height in this
case is the segment . We have marked the baseline and altitude in this example so that you can see how this
terminology works, but we’ll move forward with just the base and height.
We have labeled the intersection of the extension of the base and the perpendicular line as , and our height in this
case is the segment . We have marked the baseline and altitude in this example so that you can see how this
terminology works, but we’ll move forward with just the base and height.
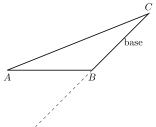 Finally, we draw the segment making a right angle with the extension of the base and passing through vertex .
Again, try doing this with your protractor on your own!
Finally, we draw the segment making a right angle with the extension of the base and passing through vertex .
Again, try doing this with your protractor on your own! 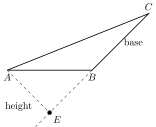 We have labeled the intersection of the extension of the base and the perpendicular line as , and our height in this
case is the segment .
We have labeled the intersection of the extension of the base and the perpendicular line as , and our height in this
case is the segment .
Next, let’s choose the segment as our base. Now we need to draw a segment which makes a right angle with segment and passes through point . We will first draw a dashed line extending the base.
Pause and think: how could you draw the height if you chose the third side of the triangle as its base? If you aren’t
sure how to answer this question, please stop by office hours!
The next type of definitions we have tell us about triangles whose angles have specific characteristics. Notice that when we talk about the angles in a shape, we are talking about the interior angles, or the ones made on the interior of the shape. There are also exterior angles, but you typically have to draw extra lines in order to see the exterior angles.
An acute triangle is a triangle where each of its angles measure less than a quarter turn (). Here is an example of
an acute triangle. 
An obtuse triangle is a triangle where one of its angles measures more than a quarter turn (). Here is an example
of an obtuse triangle. 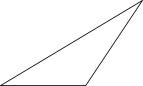
A right triangle is a triangle where one of its angles measures exactly a quarter turn (). Here is an example of a
right triangle. 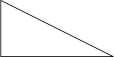
Our next definitions are about special kinds of quadrilaterals. Pay close attention to the details in these definitions!
A rectangle is a quadrilateral where all of its angles are right angles. Here is an example of a rectangle.

A square is a quadrilateral where all of its angles are right angles and all of its sides have equal length. Here is an
example of a square. 
Remember that quadrilaterals are still polygons, so when we talk about the “sides” here, we are still talking about
edges or straight sides!
A rhombus is a quadrilateral where all of its sides have the same length. Here is an example of a rhombus.

A parallelogram is a quadrilateral where both pairs of opposite sides are parallel. Here is an example of a
parallelogram. 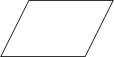
A kite is a quadrilateral with two separate pairs of equal sides where the equal sides are next to each other (also
called adjacent). Here is an example of a kite. 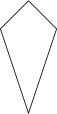
A trapezoid is a quadrilateral with at least one pair of parallel sides. Here is an example of a trapezoid.
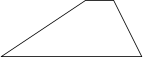
An isosceles trapezoid is a quadrilateral with at least one pair of parallel sides and two pairs of equal adjacent
angles. Here is an example of an isosceles trapezoid. 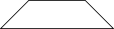
Notice that we could also say that an isosceles trapezoid is a trapezoid with two pairs of equal adjacent
angles.
Finally, we have one special kind of polygon that we would like to be able to recognize.
A polygon is called regular
if all of its edges are the same length and all of its angles have the same measure. Here is an example of a regular
polygon. 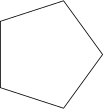
We also have shapes that have round sides instead of straight sides.
A circle is formed by first selecting a point ,
called the center of the circle and a distance , called the radius. Then, to form the circle, we draw all points in 2D
space which are at a distance of from the point .
What dimension is the circle defined above?
Did the answer to the dimension question surprise you? In English, we usually use the word “circle” in two
different ways: first to refer to both the “outside edge” as in our definition above and second to refer
to all of the 2D space inside the “outside edge”. In mathematics, we usually use the word disk to
refer to the 2D space inside a circle so that we have different words for these two objects. You can
choose which terminology you like, but please also use definitions in your explanations so that they are
clear!
one-dimensional two-dimensional three-dimensional something else
There are many other types of shapes as well, such as ellipses, ovals, and so on. If you run in to a type of shape and you aren’t sure what the definition of that shape should be, please ask us or look it up!
4 Solids
Now, let’s talk about 3D shapes.
Returning to our ideas about dimension, we usually draw lines to sketch 3D shapes on the page, but the lines themselves are only one dimensional. We can also imagine the sides of our shapes, perhaps made out of paper.
When we refer to the 3D shape, often called a solid, we are referring to the lines, the sides, and all of the space inside as well. Our friend the little bug could fly around in there!Our 3D solids still have vertices and edges, just like our 2D shapes, but now we also have faces, which refer to the “paper sides” of the solid. Each piece of paper that you might cut out and use to build the shape would be a face.
When we think of our solid as made out of paper or another material, we may find it helpful to draw that pattern out.
A net for a solid is a 2D pattern made out of shapes that we could cut out and fold up to form the solid in
question. Here is an example of a net for a cube. 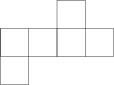
How many vertices, edges, and faces does the cube below have? You might want to draw the net
above on a piece of paper, cut it out, and fold it up to help you visualize what’s going on here! 
Vertices:
Edges:
Faces:
We have been using the example of a cube, but we haven’t defined that yet. Let’s be a bit more specific.
A prism is a 3D solid which is made by taking two copies of a polygon, lifting one up above the other while keeping
the original shapes parallel and not twisting the lifting shape. Next, we connect the corresponding vertices on the
two copies of the shape with edges. The prism is the 3D solid enclosed by this construction. The prism is called
right if the lifted copy sits directly over the original copy, and the prism is called oblique if we shifted the lifted
copy to the left or right.

Here is an example of a right prism with the pentagons forming the base drawn with thicker lines than the height. The pentagons are also shaded gray to help you see that these are the top and bottom of the prism.
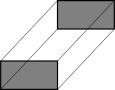
Here is an example of an oblique prism. Here, the rectangles forming the base are drawn with thicker lines and shaded gray to help you see what happened. The shaded rectangles are the top and bottom of the prism. Note that the top copy of the rectangle has been shifted over so that the faces of the prism are now parallelograms.
Typically, we name the prism using the name of its base. So, the right prism above could also be called a right pentagonal prism, because it is a right prism with pentagons for bases. And the oblique prism could also be called an oblique rectangular prism, because it is an oblique prism with rectangles for bases.
Here is one special kind of prism.
A cube is a right square prism where the height is equal in length to the length of
the sides of the square base.
A right prism has its base as a square with side lengths centimeters on each side. If this prism is a cube, what is its
height? centimeters
A cylinder is like a prism, except instead of a polygon for the base, we can use any other shape. We use the same process for building: take two copies of your shape and lift one above the other without twisting so that the two copies are parallel. Connect corresponding points on the two shapes, though in this case you might have to think about connecting each point rather than connecting vertices. You may also think about wrapping a piece of fabric or flexible paper around the outside of the solid so that you can see the solid.
If we make a cylinder with a circular base, we get what you typically think about as a cylinder.
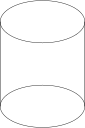
However, we can make a cylinder with many other shapes for the base, and we can make both right cylinders and oblique cylinders.
Pause and think: can you draw an oblique cylinder with a bean-shaped base? Add your sketch to your
notes.
A pyramid is formed when we start with a polygon as a base, then choose a point above the polygon. We connect
each vertex of the polygon to that point, and then consider the 3D space inside the edges we have drawn. The
point at the top is called the apex. The pyramid is a right pyramid if the apex is directly above the
center of the base, and it is called an oblique pyramid if the apex is not above the center of the
base.

Here is an example of a right pyramid with a trapezoid base. The trapezoid is outlined with a thicker line and shaded gray to help you see what is happening.
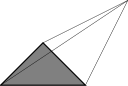
Here is an example of an oblique pyramid with a triangle base. The triangle base is outlined with a thicker line and shaded gray to help you see what is happening.
Pyramids are usually named for the 2D shape used as the base. For instance, our right pyramid above is a trapezoidal pyramid, because its base is a trapezoid. Our oblique pyramid is a triangular pyramid because its base is a triangle.
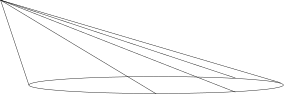
A cone is like a pyramid, except we don’t have to use a polygon for its base and can instead use any shape. In terms of an analogy, a cone is to a pyramid as a cylinder is to a prism. If we use a circle as the base and draw a right cone, we get the shape that most frequently comes to mind when we imagine a cone.
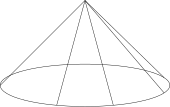
However, we could draw many other shapes for the base. Here is an example of an oblique cone with an oval base.
We also have a 3D analogue of circles and disks.
A sphere is the set of all points in 3D space that are at a distance
of , called the radius, from a chosen point , called the center. Just like with circles, we first choose and , and then
form the sphere.
Again, we have the trouble that the sphere itself is actually two dimensional, but we also use the word “sphere” to
refer to the 3D space inside the object we just defined. Unlike with circles, we don’t have another word in
mathematics to solve this problem. Maybe you can come up with a good one – but as always, practice writing the
definitions in your explanations!
Pause and think: we’ve described a lot of different 3D solids. Which ones have nets which are easy to draw? Which
ones have nets which are difficult to draw?
2026-07-22 20:17:30